Lecture 3 - Deployment and Production Considerations
Deploying Machine Learning Applications
TL;DR:
If you’re short on time, tune into the cosmic highlights of our course in this audio summary:
In this course, we embark on a stellar journey to master the deployment of machine learning applications:
- Containerization with Docker: Your starship for consistent and portable deployments.
- CI/CD Pipelines using GitHub Actions: Automate your deployment journey like a seasoned Jedi.
- Heroku Deployment: Launch your applications into the cloud galaxy with ease.
- Best Practices: Optimize, scale, and secure your deployments for interstellar performance.
- Advanced Tools: Explore the vast universe of cloud platforms and orchestration tools.
Your deployment is a starship.
Each component is a crucial part of your mission, from the engines (Docker) to the navigation system (GitHub Actions).

Containerization is like building a reliable starship that can travel across different galaxies (environments) without a hitch. CI/CD Pipelines are your autopilot, ensuring smooth and automated journeys through the deployment cosmos.
Heroku is your launchpad, propelling your applications into the cloud with the grace of a Jedi starfighter. Best Practices are your navigational charts, guiding you through optimization, scaling, and security challenges.
Advanced Tools are the hyperdrive enhancements, allowing you to explore new frontiers in cloud deployment and orchestration.
Are you ready to launch your machine learning applications into the cloud galaxy?
Let’s get started on this epic adventure!
1. Introduction to Deploying Machine Learning Applications
1.1. The Challenges of Deploying Machine Learning Models
Deploying machine learning models can sometimes feel like trying to fit a square peg into a round hole. Unlike traditional software, these models are like your favorite rock band—dynamic, unpredictable, and requiring lots of fine-tuning for each performance.
Let’s explore these challenges in detail:
Environment Mismatch: Imagine your model is a Broadway star, rehearsed and fine-tuned in one environment, but on opening night, the stage looks completely different.
This mismatch is one of the most common issues faced during deployment.
Different machines might have various operating systems, library versions, or hardware configurations, causing unexpected behavior when the model is deployed. This is akin to a musician arriving at a venue only to find their instruments are tuned differently or missing entirely.
To mitigate this, it’s essential to maintain a consistent environment across development and production stages. This can be achieved through environment management tools like virtualenv for Python or using containerization technologies like Docker, which we will explore later.
Scalability Issues: Picture a concert where more fans show up than the venue can handle. Your model should be ready to handle the crowd, scaling up or down as needed. Scalability is crucial, especially in cloud-based applications where the user base can grow unpredictably.
Without proper scalability, applications can suffer from slow response times or crashes under heavy load.
To address scalability, load testing tools like Apache JMeter or Locust can be used to simulate a range of traffic conditions. Additionally, cloud platforms like AWS, Azure, and Google Cloud offer auto-scaling features that automatically adjust resources based on demand.
Version Control: Like a band releasing multiple albums, tracking different versions of your models is crucial to know which one hits the right note. Imagine if every time a band played, they had to remember which version of their song arrangement they were supposed to perform. Similarly, in machine learning, keeping track of model versions ensures that you can revert to previous versions if a new model does not perform as expected.
Tools like DVC (Data Version Control) and MLflow provide mechanisms to manage and version control models, datasets, and experiments, making it easier to reproduce results and manage model lifecycle.
Performance Optimization: Ensuring your model performs efficiently is like ensuring the lead singer hits all the right notes during a live performance. Performance can be influenced by factors such as model complexity, data input size, and computational resources. Optimizing performance is crucial for providing a seamless user experience and can also reduce computational costs.
Techniques such as quantization, pruning, and knowledge distillation can be applied to reduce model size and improve inference speed without significantly sacrificing accuracy. Profiling tools like TensorBoard and PyTorch’s profiler can help identify performance bottlenecks in your model.
1.2. Different Deployment Approaches
Deploying models isn’t a one-size-fits-all approach.
It’s more like choosing between a solo acoustic set or a full-on rock concert. Each deployment strategy has its pros and cons, depending on the specific requirements and constraints of the application.
Let’s explore these different paths in detail:
Local Deployment: It’s like playing music for your friends in your garage. Quick and easy, but not scalable. Local deployment is suitable for testing and development purposes, allowing you to quickly iterate and debug models on your local machine. However, it lacks the scalability and reliability needed for production environments.
For local deployment, tools like Jupyter Notebooks or local Flask servers can be used to serve models and test their endpoints. This approach is ideal for prototyping and learning but not for handling production-scale traffic.
Server-Based Deployment: Imagine booking a local venue. More organized and can handle a decent crowd, but may require manual tuning when issues arise. Server-based deployment involves hosting your model on dedicated servers, either on-premises or in the cloud. This approach provides more control over the environment and resources.
Servers can be configured using web frameworks like Flask or Django in combination with WSGI servers like Gunicorn. This setup provides flexibility and control, but requires manual management of scalability, load balancing, and failover mechanisms.
Cloud Deployment: Now, we’re talking major festival level. Your model gets the flexibility and power of cloud resources, scaling up and down with ease. Cloud deployment is the go-to solution for applications requiring high availability and scalability. Cloud platforms like AWS SageMaker, Azure Machine Learning, and Google AI Platform offer managed services for deploying and scaling models effortlessly.
With cloud deployment, you can leverage features like auto-scaling, load balancing, and continuous integration/continuous deployment (CI/CD) pipelines to ensure your model is always available and up-to-date. Additionally, cloud providers offer a variety of instance types, allowing you to choose the best resources for your model’s needs.
Edge Deployment: Think of it as a secret pop-up concert. Models are deployed closer to where the action happens, reducing latency and bandwidth use. Edge deployment is ideal for applications requiring real-time inference or operating in environments with limited connectivity.
Edge devices, such as IoT devices, smartphones, or embedded systems, can run machine learning models using frameworks like TensorFlow Lite or ONNX Runtime. This approach minimizes data transmission to central servers, reducing latency and improving privacy and security. Edge deployment is popular in industries like autonomous vehicles, healthcare, and smart cities.
1.3. Introduction to Containerization with Docker
Enter Docker, the magical tour bus for your model, ensuring it arrives at each destination ready to rock without missing a beat. Containerization has revolutionized the way applications are developed, shipped, and deployed, offering a standardized approach to packaging applications and their dependencies.
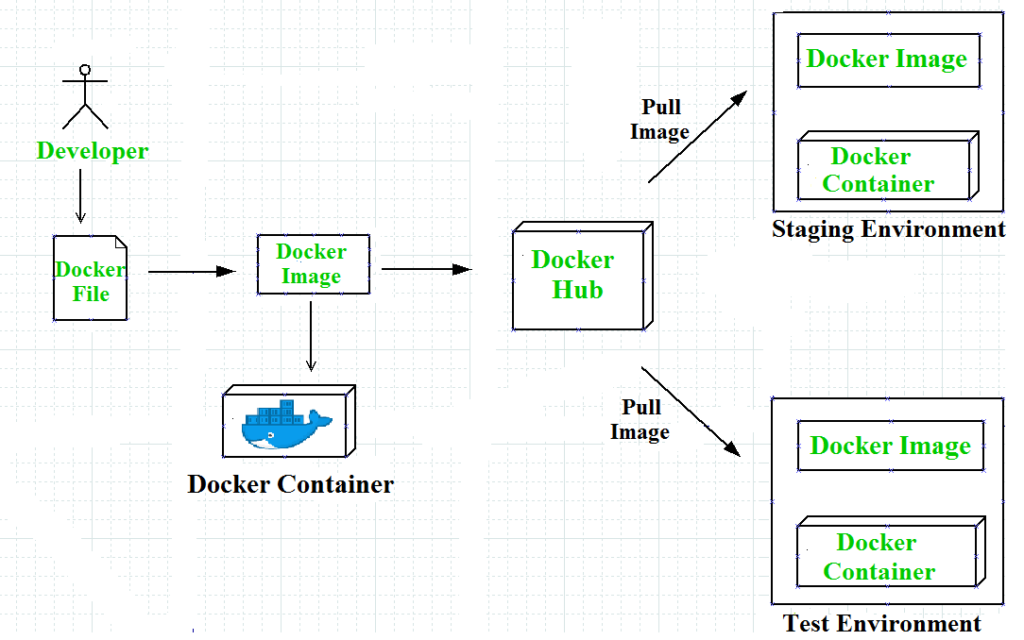
What is Docker? Docker is like your model’s private dressing room, encapsulating all its dependencies, libraries, and code into a neat package called a “container.” This ensures that wherever your model goes, it performs consistently. Containers are lightweight, portable, and can run on any machine that supports Docker, eliminating the “works on my machine” problem.
Docker containers are built from images, which are read-only templates describing how to create a container. These images can be shared and versioned, making it easy to distribute and update your application.
Why Docker?
- Portability: Containers are like your model’s passport, allowing it to travel seamlessly across different environments. Docker ensures your application runs the same way on a developer’s laptop, a test server, or a production cloud environment.
- Consistency: Just as a band needs the same instruments wherever they play, Docker ensures your model has everything it needs. Containers include all dependencies, libraries, and configuration files required to run an application, ensuring consistency across deployments.
- Efficiency: Docker containers are lightweight, meaning you can run multiple containers on a single machine without hogging resources. Unlike traditional virtual machines, containers share the host system’s kernel, reducing overhead and improving resource utilization.
- Isolation: Just as each band member needs their space, Docker provides isolated environments, ensuring no conflicts between models. Containers run in their own isolated environment, preventing interference from other applications or processes on the host system.
Building a Docker Image: To create a Docker image, you need to write a Dockerfile, which is a plain text file containing instructions on how to build the image. Here’s a simple example of a Dockerfile for a Python application:
# Use an official Python runtime as a parent image
FROM python:3.8-slim

# Set the working directory in the container
WORKDIR /app

# Copy the current directory contents into the container at /app
COPY . /app

# Install any needed packages specified in requirements.txt
RUN pip install --no-cache-dir -r requirements.txt

# Make port 80 available to the world outside this container
EXPOSE 80

# Define environment variable
ENV NAME World

# Run app.py when the container launches
CMD ["python", "app.py"]
This Dockerfile specifies a base image (python:3.8-slim), sets up a working directory, copies the application code, installs dependencies, exposes a port, and defines the command to run the application.
1.4. Benefits of Using Docker for Deployment
Using Docker for deployment is akin to having a trusted roadie crew—everything runs smoother, faster, and with less hassle. Docker offers several benefits that make it an ideal choice for deploying machine learning models/
Key Benefits:
Isolation: Just as each band member needs their space, Docker provides isolated environments, ensuring no conflicts between models. Containers run in their own sandbox, separated from the host system and other containers, preventing interference from other applications or processes. This isolation also enhances security by limiting the attack surface and potential vulnerabilities.
Reproducibility: Docker guarantees that “what happens in rehearsal stays in rehearsal,” meaning your model will work anywhere it’s deployed. This reproducibility is crucial for machine learning workflows, as it ensures that the same environment used during development and testing is preserved in production. By encapsulating all dependencies and configurations in a Docker image, you can easily share and replicate your setup across different machines or teams.
Scalability: When your model’s performance becomes a hit, Docker allows you to scale up effortlessly, ensuring it reaches audiences far and wide. Docker containers can be deployed and managed using orchestration tools like Kubernetes, which automates the scaling, distribution, and management of containerized applications. This enables you to efficiently handle varying workloads by adding or removing containers based on demand.
Simplified Management: Docker streamlines the deployment process, letting you focus on the music (or in this case, the model). With Docker, you can use a single command to build, ship, and run your application, simplifying the deployment pipeline and reducing the risk of errors. Additionally, Docker Hub, a cloud-based registry service, allows you to store and distribute your images, making it easy to manage updates and versioning.
Resource Efficiency: Docker containers are lightweight and share the host system’s kernel, allowing you to run multiple containers on a single machine without incurring the overhead of traditional virtual machines. This efficient use of resources reduces infrastructure costs and improves performance, especially in environments with limited hardware capacity.
Cross-Platform Compatibility: Docker containers can run on any system that supports Docker, regardless of the underlying operating system. This cross-platform compatibility ensures that your application behaves consistently across different environments, from local development machines to cloud servers and edge devices.
Real-World Applications of Docker:
Docker is widely used across various industries to streamline the deployment and management of machine learning models. Here are a few examples:
FinTech: Financial technology companies use Docker to deploy models for fraud detection, risk assessment, and automated trading. Docker’s isolation and security features ensure that sensitive data and algorithms are protected, while its scalability allows for real-time processing of large volumes of financial transactions.
Healthcare: In healthcare, Docker enables the deployment of models for medical imaging analysis, predictive diagnostics, and personalized treatment recommendations. By using containers, healthcare providers can ensure compliance with data privacy regulations and easily share models across different hospitals and research institutions.
E-commerce: E-commerce platforms leverage Docker to deploy recommendation engines, customer segmentation models, and demand forecasting algorithms. Docker’s resource efficiency and scalability allow these platforms to handle peak traffic during sales events and provide personalized experiences to millions of users.
Autonomous Vehicles: The automotive industry uses Docker to deploy machine learning models for autonomous driving, object detection, and route planning. Docker’s portability and cross-platform compatibility facilitate testing and deployment across various hardware and software configurations, accelerating the development of self-driving technologies.
2. Getting Started with Docker
2.1. Installing and Configuring Docker
Before we can start containerizing applications, we need to install Docker on our system.
Docker provides a seamless installation process across various platforms, including Windows, macOS, and Linux.
Here’s a comprehensive guide on installing Docker across different platforms and ensuring it’s ready for containerizing applications:
Installing Docker
Before diving into containerization, you need to install Docker on your system. Docker offers a straightforward installation process across various operating systems, including Windows, macOS, and Linux.
Installation Steps
1. Docker Desktop (Windows & macOS)
For users on Windows and macOS, Docker Desktop is the most convenient option. It provides a graphical user interface (GUI) and integrates seamlessly with your system for efficient container management.
- Download: Visit the official Docker website to download Docker Desktop.
- Installation:
- Follow the installation instructions provided on the website.
- During the installation, you may need to enable WSL 2 (Windows Subsystem for Linux) for Windows users, as this is required for Docker to run smoothly.
2. Linux Installation
For Linux users, Docker can be installed using package managers specific to your distribution.
Ubuntu:
sudo apt update sudo apt install apt-transport-https ca-certificates curl software-properties-common curl -fsSL https://download.docker.com/linux/ubuntu/gpg | sudo apt-key add - sudo add-apt-repository "deb [arch=amd64] https://download.docker.com/linux/ubuntu $(lsb_release -cs) stable" sudo apt update sudo apt install docker-ceCentOS:
sudo yum install -y yum-utils
sudo yum-config-manager --add-repo https://download.docker.com/linux/centos/docker-ce.repo
sudo yum install docker-ce
For detailed installation instructions for different Linux distributions, refer to the official Docker documentation.
3. Configuration
After installation, you may need to configure Docker to suit your development environment:
- Start Docker on Boot: Ensure Docker starts automatically when your system boots up.
- Network Settings: Configure any specific network settings as required for your applications.
- User Permissions: Manage user permissions to allow specific users to run Docker commands without needing
sudo.
You can find guidance on these configurations in the Docker documentation.
4. Verify Installation
Once you’ve completed the installation, it’s important to verify that Docker is working correctly:
Open your terminal and run the following command:
docker --versionIf Docker is installed properly, this command will display the installed Docker version, confirming that Docker is ready for use.
2.2. Key Concepts: Images, Containers, Dockerfile
Understanding Docker’s core concepts is crucial for effectively using this powerful tool. Let’s break down these concepts:
Images: Docker images are the blueprints for containers. They contain everything needed to run an application, including the code, runtime, libraries, and environment variables. Images are built from a set of instructions defined in a Dockerfile and can be shared via Docker Hub or private registries.
Containers: Containers are the running instances of Docker images. They encapsulate an application and its environment, ensuring consistent behavior across different systems. Containers are lightweight and can be started, stopped, and scaled independently, making them ideal for microservices architectures.
Dockerfile: A Dockerfile is a text file containing a series of instructions on how to build a Docker image. It specifies the base image, application code, dependencies, and any additional configuration needed. Writing a Dockerfile is the first step in containerizing an application.
2.3. Creating a Simple Docker Image for a FastAPI Application
Let’s create a simple Docker image for a FastAPI application. This hands-on example will guide you through the process of writing a Dockerfile and building an image.
Step-by-Step Guide:
- Create a FastAPI Application: Start by creating a simple FastAPI application. For this example, we’ll use a basic FastAPI app:
# app.py
from fastapi import FastAPI

app = FastAPI()

@app.get("/")
async def read_root():
return {"Hello": "Docker"}- Write a Dockerfile: Create a
Dockerfilein the same directory as your FastAPI application. Here’s a simple example:
# Use an official Python runtime as a parent image
FROM python:3.8-slim

# Set the working directory in the container
WORKDIR /app

# Copy the current directory contents into the container at /app
COPY . /app

# Install FastAPI and Uvicorn
RUN pip install --no-cache-dir fastapi uvicorn

# Make port 80 available to the world outside this container
EXPOSE 80

# Run app.py when the container launches
CMD ["uvicorn", "app:app", "--host", "0.0.0.0", "--port", "80"]- Build the Docker Image: Open your terminal, navigate to the directory containing the
Dockerfile, and run the following command to build the image:
docker build -t my-fastapi-app .This command tells Docker to build an image named my-fastapi-app using the current directory as the build context.
- Verify the Image: Once the build is complete, verify that the image was created successfully by running:
docker imagesYou should see my-fastapi-app listed among the available images.
2.4. Running and Managing Docker Containers
Now that we have a Docker image, let’s run it as a container and explore how to manage it.
Running a Container:
- Start the Container: Use the
docker runcommand to start a container from the image we just built:
docker run -d -p 4000:80 my-fastapi-appThis command runs the container in detached mode (-d) and maps port 4000 on your host to port 80 in the container, allowing you to access the application via http://localhost:4000.
- Verify the Container: Check that the container is running by listing all active containers:
docker psYou should see my-fastapi-app in the list, along with its container ID and status.
Managing Containers:
- Stopping a Container: To stop a running container, use the
docker stopcommand followed by the container ID or name:
docker stop <container_id>- Removing a Container: Once a container is stopped, you can remove it using the
docker rmcommand:
docker rm <container_id>- Viewing Logs: To view the logs of a running container, use the
docker logscommand:
docker logs <container_id>This is useful for debugging and monitoring your application’s output.
- Accessing a Container’s Shell: If you need to interact with a container’s file system or execute commands inside it, use the
docker execcommand to open a shell session:
docker exec -it <container_id> /bin/bash3. Dockerizing a Machine Learning Application
3.1 Introduction to the Example Machine Learning Application (Boston Housing Pricing)
Imagine you’re a real estate wizard 🧙, and you have a magical tool that can predict house prices in Boston based on various features.
That’s exactly what we’re building—a machine learning model that predicts housing prices. But we’re not stopping there! We’ll wrap this model in a FastAPI application so others can use it to make predictions.
Think of it as building a crystal ball 🔮 that anyone can access via the internet!
3.1.1 About the Boston Housing Dataset
- Dataset: Contains information about Boston house prices, such as crime rate, number of rooms, and distance to employment centers.
- Goal: Predict the median value of owner-occupied homes (in $1000’s) based on these features.

Project Structure
Let’s outline the structure of our project:
boston_housing_app/
├── app.py
├── model.joblib
├── requirements.txt
├── Dockerfile
└── README.md
3.1.2 Training the Machine Learning Model
First, we’ll train our model and save it for later use in our FastAPI app.
# train_model.py
import pandas as pd
from sklearn.datasets import load_boston
from sklearn.model_selection import train_test_split
from sklearn.linear_model import LinearRegression
import joblib

# Load the dataset
boston = load_boston()
X = pd.DataFrame(boston.data, columns=boston.feature_names)
y = boston.target

# Split the data
X_train, X_test, y_train, y_test = train_test_split(X, y, test_size=0.2, random_state=42)

# Train the model
model = LinearRegression()
model.fit(X_train, y_train)

# Save the model
joblib.dump(model, 'model.joblib')
print("Model trained and saved!")🔥Explanation: We load the dataset, split it, train a Linear Regression model, and save it using joblib.
Run the Training Script
python train_model.pyAfter running this script, you’ll have a model.joblib file saved in your directory.
3.1.3 Building the FastAPI Application
Now, let’s create a FastAPI application that loads this model and provides an endpoint to make predictions.
Add fastapi and uvicorn to your requirements.txt:
# requirements.txt
fastapi
uvicorn[standard]
pandas
scikit-learn
joblib
# app.py
from fastapi import FastAPI
from pydantic import BaseModel
import joblib
import pandas as pd
# Initialize the app
app = FastAPI(title="Boston Housing Price Prediction API")
# Load the model
model = joblib.load('model.joblib')
# Define the request body
class PredictionRequest(BaseModel):
CRIM: float
ZN: float
INDUS: float
CHAS: float
NOX: float
RM: float
AGE: float
DIS: float
RAD: float
TAX: float
PTRATIO: float
B: float
LSTAT: float
# Define the response
class PredictionResponse(BaseModel):
price: float
# Root path
@app.get("/")
def read_root():
return {"message": "Welcome to the Boston Housing Price Prediction API!"}
# Prediction endpoint
@app.post("/predict", response_model=PredictionResponse)
def predict(request: PredictionRequest):
data = request.dict()
df = pd.DataFrame([data])
prediction = model.predict(df)[0]
return {"price": prediction}🔥Explanation:
- FastAPI App: We initialize a FastAPI app.
- Model Loading: We load the pre-trained model.
- Request and Response Models: Using Pydantic’s
BaseModelto define the expected input and output data structures. - Endpoints:
- GET
/: A welcome message. - POST
/predict: Accepts house features and returns the predicted price.
- GET
Running the FastAPI App Locally
To run the app locally, you can use Uvicorn:
uvicorn app:app --host 0.0.0.0 --port 8000Open your browser and navigate to http://localhost:8000/docs to see the interactive API docs provided by FastAPI! 🎉
3.2 Creating a Dockerfile for the Application
Now that we have our FastAPI app ready, let’s containerize it using Docker so we can deploy it anywhere.
3.2.1 Understanding the Dockerfile
A Dockerfile is like a recipe for creating a Docker image. It tells Docker what base image to use, what files to copy, what commands to run, and which ports to expose.
Writing the Dockerfile
# Dockerfile

# Use an official Python runtime as a parent image
FROM python:3.9-slim

# Set the working directory in the container
WORKDIR /app

# Copy the requirements file into the container
COPY requirements.txt .

# Install dependencies
RUN pip install --no-cache-dir -r requirements.txt

# Copy the rest of the code into the container
COPY . .

# Expose port 8000
EXPOSE 8000

# Run the application
CMD ["uvicorn", "app:app", "--host", "0.0.0.0", "--port", "8000"]
3.2.2 Explanation of the Dockerfile
FROM python:3.9-slim: We start from a slim version of Python 3.9 to keep the image lightweight.WORKDIR /app: Sets the working directory inside the container to/app.COPY requirements.txt .: Copiesrequirements.txtinto the container.RUN pip install --no-cache-dir -r requirements.txt: Installs the dependencies without caching to save space.COPY . .: Copies all files from the current directory into the container.EXPOSE 8000: Exposes port8000for the app.CMD [...]: The command to run when the container starts. Here, we start the Uvicorn server.
3.3 Defining Dependencies and Configurations
Dependencies are crucial. They ensure that our application has everything it needs to run correctly inside the container.
3.3.1 The requirements.txt File
We’ve already defined our dependencies in the requirements.txt file:
fastapi
uvicorn[standard]
pandas
scikit-learn
joblib
3.3.2 Environment Variables (Optional)
If your application requires environment variables (like API keys, database URLs), you can define them in the Dockerfile using ENV or pass them at runtime.
Example in Dockerfile:
ENV MODEL_NAME="Boston Housing Predictor"In app.py, you can access it:
import os

model_name = os.getenv("MODEL_NAME", "Default Model")
But be cautious! For sensitive information like API keys, it’s better to pass them at runtime or use Docker secrets.
3.4 Exposing Ports and Setting the Run Command
Exposing ports is like opening the door 🚪 of your container to the outside world so that others can interact with your application.
3.4.1 Exposing Ports
In the Dockerfile:
EXPOSE 8000This tells Docker that the container listens on port 8000 during runtime.
3.4.2 Setting the Run Command
The CMD instruction specifies the command to run when the container starts:
CMD ["uvicorn", "app:app", "--host", "0.0.0.0", "--port", "8000"]uvicorn app:app: Runs theappobject fromapp.pyusing Uvicorn.--host 0.0.0.0: Makes the server accessible externally.--port 8000: Runs the server on port 8000.
3.5 Building and Running the Docker Container
Time to bring everything together and see the magic happen! 🎩✨
3.5.1 Build the Docker Image
In your terminal, navigate to the project directory and run:
docker build -t boston-housing-api .docker build: Builds an image from a Dockerfile.-t boston-housing-api: Tags the image with the nameboston-housing-api..: Specifies the build context (current directory).
3.5.2 Run the Docker Container
docker run -d -p 8000:8000 boston-housing-api-d: Runs the container in detached mode (in the background).-p 8000:8000: Maps port 8000 of your local machine to port 8000 of the container.boston-housing-api: The name of the image to run.
3.5.3 Verify the Application is Running
Open your browser and go to http://localhost:8000/docs. You should see the interactive API documentation.
- Click on the
/predictendpoint. - Click Try it out.
- Enter sample data. For example:
{
  "CRIM": 0.1,
  "ZN": 18.0,
  "INDUS": 2.31,
  "CHAS": 0.0,
  "NOX": 0.538,
  "RM": 6.575,
  "AGE": 65.2,
  "DIS": 4.09,
  "RAD": 1.0,
  "TAX": 296.0,
  "PTRATIO": 15.3,
  "B": 396.9,
  "LSTAT": 4.98
}- Click Execute.
- You should receive a predicted price in the response!
3.6 Deploying the Docker Image
Now that our application is containerized, we can deploy it anywhere Docker is supported—be it a cloud service like AWS, Azure, Google Cloud, or even on a Raspberry Pi! Let’s go over a simple deployment to a cloud service.
3.6.1 Deploy to Heroku (Using Container Registry)
Heroku is a cloud platform that supports Docker deployments via its Container Registry.
Prerequisites:
- Install the Heroku CLI.
- Create a Heroku account.
Steps:
Login to Heroku Container Registry:
heroku login
heroku container:login
Create a New Heroku App:
heroku create boston-housing-api-appPush the Docker Image to Heroku:
heroku container:push web -a boston-housing-api-appRelease the Image:
heroku container:release web -a boston-housing-api-appOpen the App:
heroku open -a boston-housing-api-app
Now your API is live on the internet! 🌐
3.6.2 Deploy to AWS Elastic Container Service (ECS)
Deploying to AWS ECS involves more steps but offers robust scalability.
High-Level Steps:
- Create a Docker Repository in Amazon Elastic Container Registry (ECR).
- Push Your Docker Image to ECR.
- Create a Task Definition in ECS using your image.
- Run a Service with the task definition.
- Set Up a Load Balancer to route traffic to your service.
Due to the complexity, consider following AWS’s detailed documentation or use AWS Fargate for serverless container deployment.
Recap and Project Structure
Let’s revisit our project structure:
boston_housing_app/
├── app.py
├── model.joblib
├── requirements.txt
├── Dockerfile
├── train_model.py
└── README.md- app.py: The FastAPI application.
- model.joblib: The saved machine learning model.
- requirements.txt: Lists all Python dependencies.
- Dockerfile: Instructions to build the Docker image.
- train_model.py: Script to train and save the model.
- README.md: Documentation for your project.
4. Introduction to GitHub Actions
The goal of this section is to introduce you to the powerful world of Continuous Integration (CI) and Continuous Delivery (CD). By the end of this chapter, you’ll have a fully automated pipeline, pushing your FastAPI app from your codebase straight to production (we’ll use Heroku as an example deployment platform).
But don’t let the technical jargon scare you—GitHub Actions is just like setting up a bunch of automated robot assistants to take care of the nitty-gritty, so you can focus on coding cool stuff!
4.1 Principles of Continuous Integration and Continuous Delivery (CI/CD)
Let’s start with the big picture: CI/CD.
These are the magic words behind modern software development.
It’s what allows big companies like Google and Netflix to deploy thousands of changes every day. So, what are they?
4.1.1 Continuous Integration (CI)
Think of CI as your safety net.
It’s the practice of automatically testing and integrating small changes into your codebase.
Imagine you’re writing your FastAPI app and every time you push your code to GitHub, all your tests automatically run.
If something breaks, you get notified instantly, instead of finding out when the app is already deployed (which we all know is a nightmare).
Key Benefits of CI:
- Instant feedback: CI helps catch bugs early.
- Stable codebase: Your main branch is always deployable.
- Developer collaboration: Multiple people can work on the same codebase without conflicts.
4.1.2 Continuous Delivery (CD)
CD is the natural extension of CI. It automates the release process so that your application is always in a deployable state. With CD, once your code passes the tests, it’s automatically pushed to a staging or production environment—without any manual steps.
Key Benefits of CD:
- Frequent releases: You can deploy to production multiple times a day.
- Fewer bugs: Smaller, more frequent releases mean less complexity.
- Improved confidence: Developers are less afraid of deploying code since it’s automated and tested.
4.2 Overview of GitHub Actions and Its Components
Now that you’re familiar with CI/CD, let’s talk about GitHub Actions—your tool to automate everything from running tests to deploying applications. GitHub Actions are workflows that are triggered by events like a pull request, a new commit, or even a scheduled time.
**Key Components of GitHub Actions:
- Workflow: A series of actions (tasks) defined in YAML format that runs when a specific event occurs.
- Event: The trigger that starts the workflow (e.g., a push to the repository, a pull request).
- Job: A workflow contains one or more jobs. A job contains multiple steps and runs on its own virtual machine or container.
- Step: A step can be a shell command, a script, or a reusable action. Multiple steps make up a job.
- Action: A predefined task that can be used in steps (e.g.,
actions/checkout@v2checks out your code).
Think of GitHub Actions as your very own robot assistants (like WALL-E) that automatically clean up after you every time you make a mess (push code). Each assistant (job) has its own task (test the app, create a Docker image, deploy it), and they all report back to you when their tasks are done.
4.3 Creating a Basic GitHub Actions Workflow
Let’s dive into the fun part—creating our first CI pipeline using GitHub Actions. We’ll start by setting up a workflow that runs tests on our FastAPI app whenever we push changes to GitHub.
4.3.1 Step 1: Creating the Workflow File
You’ll need to create a file in your repository at .github/workflows/ci.yml. GitHub will automatically detect this file and run the instructions inside whenever the specified events occur.
Here’s a simple workflow that: - Triggers on every push and pull_request to the main branch. - Runs a set of Python unit tests.
name: CI for FastAPI Application

on:
  push:
    branches:
      - main
  pull_request:
    branches:
      - main

jobs:
  test:
    runs-on: ubuntu-latest

    steps:
      - name: Checkout repository
        uses: actions/checkout@v2

      - name: Set up Python
        uses: actions/setup-python@v2
        with:
          python-version: '3.9'

      - name: Install dependencies
        run: |
          pip install -r requirements.txt

      - name: Run tests
        run: |
          pytest
4.3.2 Breakdown of Workflow
- on: This defines when the workflow will be triggered. In our case, it will trigger on a
pushor apull_requestto themainbranch. - jobs: Defines what jobs will run. Here we have a
testjob that runs onubuntu-latest(a virtual machine provided by GitHub). - steps: Steps are the individual tasks for each job. In this case, we:
- Checkout the code using
actions/checkout@v2. - Set up Python 3.9 using
actions/setup-python@v2. - Install dependencies from the
requirements.txtfile. - Run tests using
pytest.
- Checkout the code using
This is your basic CI pipeline. Each time you push code, it automatically runs tests, letting you know if anything is broken before you deploy. Easy-peasy!
4.4 Defining Triggers and Jobs for Deployment
Now, let’s go a step further. Testing is important, but what if you could deploy your app every time your tests pass? Enter CD.
We’ll now define a trigger that not only runs tests but also deploys our FastAPI app.
Here’s how you do it:
name: CI/CD for FastAPI Application

on:
  push:
    branches:
      - main

jobs:
  test:
    runs-on: ubuntu-latest

    steps:
      - name: Checkout repository
        uses: actions/checkout@v2

      - name: Set up Python
        uses: actions/setup-python@v2
        with:
          python-version: '3.9'

      - name: Install dependencies
        run: |
          pip install -r requirements.txt

      - name: Run tests
        run: |
          pytest

  deploy:
    runs-on: ubuntu-latest
    needs: test  # Ensures deploy only runs if the tests pass
    steps:
      - name: Checkout repository
        uses: actions/checkout@v2

      - name: Deploy to Heroku
        run: |
          heroku login
git push heroku main🔥Explanation:
- deploy job: Runs after the
testjob (needs: testensures that deployment only happens if tests pass). - Deploy to Heroku: Uses
git push heroku mainto deploy the application.
4.5 Creating a Deployment Workflow for Heroku
Now let’s build a dedicated deployment workflow for Heroku using GitHub Actions. We’ll assume you already have a Heroku account and a deployed FastAPI app.
4.5.1 Setup Heroku CLI
Before running the deployment commands, ensure you install the Heroku CLI:
- name: Install Heroku CLI
  run: curl https://cli-assets.heroku.com/install.sh | sh
4.5.2 Authenticating Heroku in GitHub Actions
You’ll need to authenticate GitHub Actions to access your Heroku app. For this, we’ll use Heroku API keys (don’t worry, we’ll cover how to keep these secure in the next section).
- name: Authenticate Heroku
  env:
    HEROKU_API_KEY: ${{ secrets.HEROKU_API_KEY }}
  run: |
    echo "machine api.heroku.com" > ~/.netrc
    echo "  login ${{ secrets.HEROKU_EMAIL }}" >> ~/.netrc
    echo "  password ${{ secrets.HEROKU_API_KEY }}" >> ~/.netrc
This authentication step uses the Heroku API Key and email (stored securely in GitHub Secrets—more on this soon).
4.5.3 Deploy Your FastAPI App
The final step is to deploy your app with Heroku:
- name: Deploy to Heroku
  run: git push heroku main
4.6 Using Secrets for Sensitive Information
We’ve mentioned GitHub Secrets, which is how we securely store sensitive information like API keys, credentials, or access tokens.
- Go to your repository on GitHub.
- Navigate to Settings -> Secrets -> Actions.
- Add the following secrets:
- HEROKU_API_KEY: Your Heroku API key.
- HEROKU_EMAIL: The email associated with your Heroku account.
Now, your workflow can use these secrets securely by referencing them as secrets.HEROKU_API_KEY and secrets.HEROKU_EMAIL.
5. Advanced Tools and Technologies
Welcome to the final chapter of your FastAPI journey!
At this point, you’ve learned how to build, containerize, and deploy your machine learning app using Docker, GitHub Actions, and Heroku. Now, let’s explore the next level of deployment tools and technologies.
This is where you unlock the door to scalability, flexibility, and enterprise-grade cloud infrastructure.
5.1 Exploring Other Cloud Platforms for Deployment (AWS, GCP, Azure)
In the previous section, we deployed our FastAPI app to Heroku—a popular platform for fast deployments. But, as your app grows, you might need more flexibility and control over the infrastructure. That’s where the big players—AWS, GCP, and Azure—come into play. These platforms offer a wide range of services tailored for enterprise applications.
AWS (Amazon Web Services)
Amazon Web Services is the largest cloud provider in the world. AWS has Elastic Beanstalk, which simplifies deploying FastAPI apps. It abstracts much of the underlying infrastructure, but if you need full control, you can use EC2 instances, S3 for storage, and RDS for databases.
Here’s how you can deploy a FastAPI app using AWS Elastic Beanstalk:
Install the AWS CLI:
pip install awsebcliInitialize Your Application: Inside your project directory:
eb init -p python-3.8 fastapi-app --region <your-region>Create and Deploy the Application:
eb create fastapi-env
eb deploy
AWS gives you deep control over the configuration, security, and scaling of your application, which is perfect for enterprise-scale apps.
Google Cloud Platform (GCP)
GCP offers App Engine, Compute Engine, and Cloud Run for deploying FastAPI applications. App Engine is the easiest way to deploy apps without managing servers, while Cloud Run allows you to deploy containerized applications.
Deploying your FastAPI app using Google App Engine:
Install the Google Cloud SDK:
curl https://sdk.cloud.google.com | bashCreate the App Engine Configuration File (
app.yaml):runtime: python38 entrypoint: uvicorn main:app --host 0.0.0.0 --port $PORTDeploy the Application:
gcloud app deploy
GCP is known for its powerful machine learning services and data analytics tools, making it a great choice for apps that require heavy data processing.
Azure
Azure App Service and Azure Kubernetes Service (AKS) are the primary deployment platforms in the Microsoft cloud ecosystem. Azure App Service simplifies the deployment process while AKS offers enterprise-grade scalability for containerized applications.
Steps to deploy using Azure App Service:
Install the Azure CLI:
az loginCreate an App Service Plan and Web App:
az webapp up --runtime "PYTHON:3.8" --name <app-name>Deploy the Application: Simply push your changes to the web app using Git or the Azure CLI.
Azure offers deep integration with Microsoft’s other tools and services, which is useful if you’re working in an enterprise environment already using Microsoft products.
5.2 Using Container Orchestration Tools like Kubernetes
Deploying individual Docker containers is great, but what if you want to scale up? That’s where Kubernetes comes into play. Kubernetes is the king of container orchestration. It helps you manage, scale, and maintain containerized applications across multiple servers (nodes).
Imagine Kubernetes as the traffic manager of your container city. It ensures that all traffic goes to the right containers (pods), scales the number of containers up or down based on demand, and keeps everything running smoothly.
Why Use Kubernetes?
- Scalability: Kubernetes automatically scales your application based on the number of requests.
- Self-Healing: If one of your containers crashes, Kubernetes automatically restarts it.
- Load Balancing: Kubernetes balances traffic across your containers so no one pod is overwhelmed.
- Deployment Rollbacks: You can easily roll back to a previous version if something goes wrong.
Deploying FastAPI on Kubernetes
Here’s a basic overview of how to get your FastAPI app running on Kubernetes:
Create a Docker Image for your FastAPI app (we’ve done this earlier).
Create a Kubernetes Deployment:
apiVersion: apps/v1
kind: Deployment
metadata:
  name: fastapi-app
spec:
  replicas: 3
  selector:
    matchLabels:
      app: fastapi
  template:
    metadata:
      labels:
        app: fastapi
    spec:
      containers:
      - name: fastapi-container
        image: <your-docker-image>
        ports:
        - containerPort: 80
Create a Service to expose your app to the internet:
apiVersion: v1
kind: Service
metadata:
  name: fastapi-service
spec:
  selector:
    app: fastapi
  ports:
  - protocol: TCP
    port: 80
    targetPort: 80
  type: LoadBalancer
Deploy on Kubernetes:
kubectl apply -f deployment.yaml
kubectl apply -f service.yaml
You can deploy Kubernetes clusters on AWS (EKS), GCP (GKE), or Azure (AKS), giving you the power to scale across the cloud.
5.3 Integrating with Managed Machine Learning Services
As data professionals, one of the coolest things you can do is integrate your FastAPI app with managed machine learning services. These cloud services take care of the heavy lifting, allowing you to scale and deploy machine learning models seamlessly.
Why Use Managed ML Services?
- Simplified Infrastructure: You don’t have to worry about setting up complex machine learning environments.
- Auto-Scaling: Cloud providers automatically scale your ML models based on usage.
- Integrations: These platforms come with tools for deploying, monitoring, and managing models in production.
Let’s look at how you can integrate with the big three: AWS, GCP, and Azure.
AWS SageMaker
SageMaker is AWS’s fully managed machine learning service. You can build, train, and deploy ML models directly from SageMaker, and integrate the deployed model into your FastAPI app.
Steps to integrate SageMaker with FastAPI: 1. Train and Deploy Your Model on SageMaker. ```python import sagemaker from sagemaker import get_execution_role
# Define the session and role session = sagemaker.Session() role = get_execution_role()
# Train a model estimator = sagemaker.estimator.Estimator(…) estimator.fit(…)
# Deploy the model predictor = estimator.deploy(initial_instance_count=1, instance_type=‘ml.m4.xlarge’) ```
Invoke the Model from FastAPI: You can invoke the deployed model in your FastAPI app using the SageMaker Runtime API:
import boto3

@app.post("/predict")
def predict(data: YourDataSchema):
    sagemaker_client = boto3.client('sagemaker-runtime')
    response = sagemaker_client.invoke_endpoint(
        EndpointName='<your-endpoint>',
        ContentType='application/json',
        Body=json.dumps(data.dict())
    )
    return response
Google AI Platform
GCP’s AI Platform offers tools for training and serving machine learning models. You can train a model in AI Platform and deploy it to a managed endpoint.
Deploy Your Model to AI Platform:
gcloud ai-platform models create model_name
gcloud ai-platform versions create version_name \
    --model model_name \
    --origin gs://path-to-your-model
Integrate with FastAPI: Use the GCP API to make predictions from your FastAPI app.
from google.cloud import aiplatform

@app.post("/predict")
def predict(data: YourDataSchema):
    client = aiplatform.gapic.PredictionServiceClient()
    response = client.predict(endpoint='<your-endpoint>', ...)
    return response
Azure Machine Learning (AML)
Azure Machine Learning (AML) is another managed service that allows you to train and deploy ML models at scale.
Deploy Your Model to Azure:
az ml model deploy -n model_name -m model.pkl --ic inference_config.json --dc deployment_config.jsonCall the Model from FastAPI:
import requests

@app.post("/predict")
def predict(data: YourDataSchema):
    response = requests.post('<your-aml-endpoint>', json=data.dict())
    return response.json()
In Summary
Congratulations on completing the course!🎉
You’ve just navigated through an exciting journey of deploying machine learning applications.
Here’s a recap of what you’ve mastered:
- Containerization with Docker: You learned how to package your applications into Docker containers, ensuring consistent and portable deployments across different environments.
- CI/CD Pipelines with GitHub Actions: You explored the principles of Continuous Integration and Continuous Delivery (CI/CD), leveraging GitHub Actions to automate your deployment workflows and streamline your development process.
- Heroku Deployment: You successfully deployed your applications to Heroku, making it simple to launch your projects into the cloud and manage them effortlessly.
- Best Practices for Deployment: You discovered essential best practices to optimize, scale, and secure your deployments, ensuring that your applications perform well under pressure.
- Advanced Tools and Technologies: You explored various cloud platforms like AWS, GCP, and Azure, delved into container orchestration with Kubernetes, and integrated with managed machine learning services to enhance your applications.
With this knowledge, you are now equipped to deploy robust, scalable machine learning applications and take on any challenge in the tech universe. The journey doesn’t end here; keep experimenting, learning, and pushing the boundaries of what’s possible! 🚀
It’s time to apply everything you’ve learned, take your applications to the next level, and impress the world with your data science skills.
Now, let’s dive into the Lab 3