Lecture 2 - Building Scalable and Efficient FastAPI Applications
TL;DR:
If you’re short on time, you can listen to the key takeaways from the course in this audio summary:
In this lecture, we cover key concepts to enhance your FastAPI development skills:
- Asynchronous Programming improves performance by handling multiple tasks simultaneously.
- Routing maps URLs to code, ensuring easy navigation within your API.
- Databases are essential for efficient data storage and retrieval in your applications.
- Dependency Injection promotes modularity, making code easier to maintain and test.
- Testing with tools like
pytestensures your application functions as expected. - Security through authentication and authorization protects your API from unauthorized access.
- Performance Optimization techniques, such as caching and async enhancements, ensure efficiency under heavy load.
Your API is a bustling city.
Each street represents a different route, leading to specific destinations (functions or data).
Asynchronous programming is like having a fleet of delivery drones zipping around, handling multiple tasks at once. Databases are the city’s bustling warehouses, storing and retrieving valuable information.
Dependency Injection is like having a reliable supply chain. It ensures that the right components (dependencies) are always available where needed. Testing is your quality control department, making sure everything runs smoothly. Security is the vigilant police force, protecting your API from hackers and unauthorized access.
Performance optimization is about keeping the city running smoothly, even during peak hours. Techniques like caching and async enhancements are your traffic management tools, ensuring that everything flows efficiently.
Are you ready to build your own API metropolis?
Let’s get started!
1. The Magic of Asynchronicity
Alright, let’s dive into the world of asynchronicity, where things happen… but they don’t always wait around for you. Get ready for some tech magic!
1.1. Synchronous vs. Asynchronous Execution
In a synchronous world, you’re the chef cooking one dish at a time. You can’t start the next meal until the first is finished and delivered—slow, right?
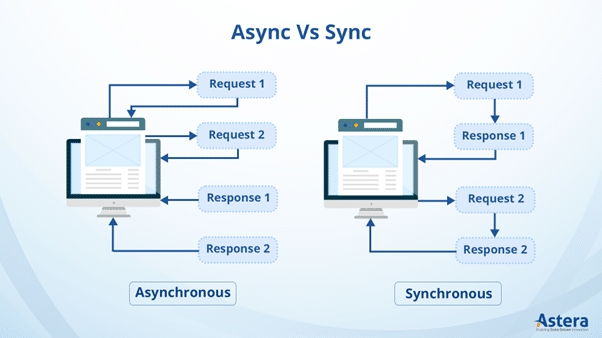
Now, welcome to the asynchronous kitchen!
Here, while one dish is cooking (waiting on I/O*, like boiling water), you can start prepping the next one. FastAPI does this for your app—it doesn’t wait idly for the oven to preheat before taking on new tasks.
I/O in computing stands for “Input/Output”. It refers to the communication between a computer system and the outside world, or between different components within a system. Here’s a brief overview:
Definition : I/O is the process of transferring data to or from a computer system.
Types
Hard I/O: Direct transfer of data between a computer and an external physical device (e.g., keyboard, mouse).
Soft I/O: Data transfer between computers or servers over a network.
Characteristics
Bidirectional: Some devices can function as both input and output devices.
Perspective-based: Whether a device is considered input or output can depend on the perspective.
Examples
Input devices: Keyboards, mice, scanners
Output devices: Monitors, printers, speakers
I/O devices: Hard drives, network cards
Importance : I/O operations are crucial for user interaction, data transfer, and system performance. Understanding I/O is essential for developers and system administrators for system design, performance optimization, and troubleshooting.
Here’s the technical breakdown:
Synchronous Execution is like cooking one meal from start to finish before even thinking about the next one. It’s linear—one task finishes, and only then does the next begin.
Asynchronous Execution is like juggling multiple orders at once. While one task waits for something (say, file reading or a web request), the event loop jumps to the next task, keeping everything moving!
Event loop is the master chef in charge, making sure no task burns by hopping from one to another.
And coroutines are those tasks—it’s like each dish being prepped. They tell the event loop,
I’m gonna be busy for a while, feel free to go check on the others.
The benefit? FastAPI can handle a huge number of requests quickly, without getting bogged down in waiting, making your app zippy and responsive, even when under heavy load.
1.2. Implementing Asynchronous Endpoints
Okay, let’s jump into FastAPI’s version of cooking up some asynchronous magic.
To make a route asynchronous, we use the keywords async and await—they’re like the VIP passes to FastAPI’s asynchronous event.
async: This tells Python that a function might take a while to complete, and it’s cool to check out other functions while waiting.await: It’s like a signal flare. It tells the event loop, “Hey, I’m waiting for this task to finish, but you don’t need to hang around! Come back later.”
Here’s a sample:
from fastapi import FastAPI

app = FastAPI()

@app.get("/async-dish")
async def cook_something():
    await prep_ingredients()  # Might take time
    await bake_dish()  # Another wait here
    return {"status": "Dish ready!"}
See how we use await to tell the event loop to handle other things while it waits for the cooking functions to finish?
That’s the magic sauce!
Let’s whip up more examples to help you better understand how to use async and await in FastAPI!
These will showcase different ways you can handle async operations in routes.
- Simulating Multiple Async Operations in Parallel
Let’s say you’re preparing different parts of a meal simultaneously. While the oven is baking the dish, you’re also mixing the salad, and getting drinks ready.
from fastapi import FastAPI
import asyncio  # For running tasks concurrently

app = FastAPI()

async def bake_dish():
    await asyncio.sleep(3)  # Simulate baking time
    return "Dish baked"

async def prepare_salad():
    await asyncio.sleep(1)  # Simulate chopping veggies
    return "Salad ready"

async def get_drinks():
    await asyncio.sleep(2)  # Simulate fetching drinks
    return "Drinks ready"

@app.get("/prepare-meal")
async def prepare_meal():
    # Run all tasks at the same time using asyncio.gather
    dish, salad, drinks = await asyncio.gather(
        bake_dish(),
        prepare_salad(),
        get_drinks()
    )
    return {"status": f"{dish}, {salad}, {drinks}!"}
🔥 Explanation: In this example, instead of waiting for each task (baking, salad prep, drinks) to finish one by one, we’re using asyncio.gather() to run all of them in parallel. The event loop jumps between these tasks while they’re waiting for something, maximizing efficiency.
- Using Async with External API Calls
Now, you’re pulling recipe data from a remote service. You don’t want your server to stop everything and wait while it fetches the data, so we make that operation asynchronous.
import httpx
from fastapi import FastAPI

app = FastAPI()

@app.get("/fetch-recipe")
async def fetch_recipe():
    async with httpx.AsyncClient() as client:
        response = await client.get('https://recipe-api.com/special-dish')
        data = response.json()
    return {"recipe": data}
🔥 Explanation: With httpx.AsyncClient(), we’re making the API call non-blocking. While the app waits for the recipe service to respond, the event loop is free to handle other requests. This is essential when working with third-party services to prevent your application from getting “stuck” waiting.
- Asynchronous File Reading
You can read files asynchronously so other requests don’t have to wait in line while your server is reading a large file.
import aiofiles  # Async library for file I/O
from fastapi import FastAPI

app = FastAPI()

@app.get("/read-steps")
async def read_steps():
    async with aiofiles.open('recipe.txt', mode='r') as file:
        content = await file.read()
    return {"recipe_steps": content}
🔥 Explanation: Here, we’re using aiofiles to open and read a file asynchronously. This allows FastAPI to handle other requests while reading the file in the background.
- Delayed Responses: Simulating Long Operations
Suppose you have a task that simulates a long operation, like slow cooking. You don’t want your app to freeze while waiting for the slow cook to finish, so you implement it asynchronously.
from fastapi import FastAPI
import asyncio  # For simulating a delay

app = FastAPI()

@app.get("/slow-cook")
async def slow_cook():
    await asyncio.sleep(5)  # Simulate a long task (e.g., slow cooking)
    return {"status": "Slow-cooked meal is ready!"}
🔥 Explanation: In this case, the asyncio.sleep(5) simulates a task that takes time (like slow cooking). While this is happening, FastAPI doesn’t sit idle—it can handle other requests while the slow-cooked meal finishes. 🐢🔥🍲
- Asynchronous Error Handling in Tasks
What if something goes wrong during one of your asynchronous tasks? For example, you’re preparing a cake but the oven breaks down midway. Let’s handle that gracefully using async and try-except.
from fastapi import FastAPI
import asyncio

app = FastAPI()

async def bake_cake():
    await asyncio.sleep(2)
    raise Exception("Oven malfunctioned!")  # Something went wrong

@app.get("/bake-cake")
async def prepare_cake():
    try:
        await bake_cake()
        return {"status": "Cake baked successfully!"}
    except Exception as e:
        return {"error": f"Oops! {e}"}
🔥 Explanation: In this example, the oven “malfunctions” during the cake-baking process. The try-except block catches the error, allowing us to return a helpful message instead of crashing the app. This is like having a backup plan in case your cake flops.
- Handling CPU-bound Tasks with Async + Background Tasks
While asynchronous tasks are great for I/O-bound operations (like waiting on APIs or files), CPU-bound operations (like heavy computations) can block the event loop. To avoid this, we can offload such tasks to background workers.
from fastapi import FastAPI, BackgroundTasks
import time  # Simulate CPU-bound task

app = FastAPI()

def heavy_computation():
    time.sleep(10)  # Simulate a long-running computation
    print("Computation done!")

@app.get("/start-computation")
async def start_computation(background_tasks: BackgroundTasks):
    background_tasks.add_task(heavy_computation)
    return {"status": "Computation started in the background!"}
🔥 Explanation: Here, BackgroundTasks allows us to offload the heavy computation (CPU-bound) to a background task so it doesn’t block the event loop. This way, FastAPI can continue processing other requests without waiting for the long-running computation to finish.
By using async and await correctly, you make your FastAPI apps super efficient, like a pro chef in a fast-paced kitchen, always juggling tasks without missing a beat!
1.3. Best Practices for Asynchronous Programming
When it comes to asynchronous programming, it’s not just about sprinkling async and await everywhere. There’s a bit of finesse to it—just like any good recipe.
- Know when to go async:
- Use async for I/O-bound tasks: things that need to wait for something external, like network requests or reading files.
- Don’t go async for CPU-bound tasks (heavy number crunching), because while your function is churning away, you’re not gaining any advantage from async’s multitasking magic.
- Error handling in asynchronous functions
Think of error handling as catching a wayward dish before it hits the ground. In asynchronous code, make sure to wrap tasks in try-except blocks, so your event loop doesn’t trip over unhandled exceptions.

Here’s how to handle errors asynchronously:
async def serve_dish():
    try:
        await bake_cake()
    except OvenFailureException:
return {"status": "Oven exploded! Call for help!"}- Simple try-except in an Asynchronous Function
import httpx
from fastapi import FastAPI

app = FastAPI()

@app.get("/get-recipe")
async def get_recipe():
    try:
        response = await httpx.get("https://random-recipes.com/cake")
        response.raise_for_status()  # Raise an error if the request failed
        return {"recipe": response.json()}
    except httpx.HTTPStatusError as e:
        return {"error": f"Recipe not available! Error: {e}"}
    except Exception as e:
        return {"error": f"Unexpected error occurred: {e}"}
🔥 Explanation: Here, we’re using httpx to make an asynchronous HTTP request. If the recipe website is down or returns an error, the HTTPStatusError exception will trigger, and we handle it smoothly without crashing the app.
- Handling Multiple Exceptions
Sometimes, different errors need different solutions. Let’s say your app reads data from a file and makes an HTTP request, both of which can fail in different ways.
import aiofiles  # Asynchronous file handling
import httpx
from fastapi import FastAPI

app = FastAPI()

@app.get("/read-data")
async def read_data():
    try:
        # Try reading from a file asynchronously
        async with aiofiles.open("data.txt", mode="r") as file:
            contents = await file.read()

        # Then, make a web request for additional info
        response = await httpx.get("https://api.example.com/data")
        response.raise_for_status()

        return {"file_data": contents, "api_data": response.json()}

    except FileNotFoundError:
        return {"error": "File not found. Please check the file path."}
    except httpx.RequestError as e:
        return {"error": f"Failed to reach API: {e}"}
    except Exception as e:
        return {"error": f"An unexpected error occurred: {e}"}
🔥 Explanation: - FileNotFoundError: Happens if the file doesn’t exist. We handle this separately with a user-friendly message. - httpx.RequestError: Happens if the API request fails (e.g., bad connection). We give a clear message indicating the API issue.
- Retry Mechanism with
try-except
Let’s say you’re dealing with flaky internet, and you want to retry a failed task a couple of times before giving up. You can create a loop with retries inside your try-except block.
import httpx
from fastapi import FastAPI

app = FastAPI()

@app.get("/retry-request")
async def retry_request():
    retries = 3
    for attempt in range(retries):
        try:
            response = await httpx.get("https://api.slow-server.com/data")
            response.raise_for_status()
            return {"data": response.json()}
        except httpx.RequestError as e:
            if attempt < retries - 1:  # Only retry if we haven't exhausted attempts
                continue
            return {"error": f"Failed after {retries} attempts. Error: {e}"}
🔥 Explanation: Here, the try-except block runs in a loop. If the request fails, the function will retry up to 3 times before giving up and returning an error.
- Chaining
asyncCalls withtry-except
Let’s say you need to perform several asynchronous tasks, and you want to catch errors at different points.
from fastapi import FastAPI

app = FastAPI()

async def get_ingredients():
    # Simulating an asynchronous function
    return {"flour": 1, "sugar": 2, "eggs": 3}

async def prepare_dough(ingredients):
    if "eggs" not in ingredients:
        raise ValueError("Missing eggs!")
    # Pretend we're making dough
    return "dough prepared"

@app.get("/make-cake")
async def make_cake():
    try:
        ingredients = await get_ingredients()
        dough = await prepare_dough(ingredients)
        return {"status": f"{dough}, ready for baking!"}

    except ValueError as e:
        return {"error": f"Invalid ingredients: {e}"}
    except Exception as e:
        return {"error": f"An unexpected error occurred: {e}"}
🔥 Explanation: - We first get ingredients asynchronously. - Then we prepare the dough asynchronously. - If there’s an issue (e.g., missing ingredients), we raise a ValueError and catch it, returning a helpful error message.
- Nested
try-exceptfor More Granular Control
Let’s get more advanced. Sometimes, you need different try-except blocks for different stages of your async workflow.
from fastapi import FastAPI
import aiofiles

app = FastAPI()

@app.get("/complex-process")
async def complex_process():
    try:
        # Stage 1: File read
        try:
            async with aiofiles.open("input.txt", mode="r") as file:
                contents = await file.read()
        except FileNotFoundError:
            return {"error": "Input file missing!"}

        # Stage 2: Process data
        try:
            # Fake processing step
            if not contents:
                raise ValueError("File is empty!")
            processed_data = contents.upper()
        except ValueError as e:
            return {"error": f"Data processing failed: {e}"}

        # Stage 3: Return response
        return {"processed_data": processed_data}

    except Exception as e:
        return {"error": f"An unexpected error occurred: {e}"}
🔥 Explanation
Here, we have different try-except blocks:
File reading (handles file errors separately).
Data processing (checks content validity).
A final catch-all to handle anything unexpected.
This allows us to give very specific error messages, depending on where things go wrong.
In the world of FastAPI, asynchronicity is like having an army of chefs helping you cook multiple meals at once. You save time, resources, and keep things running smoothly.
Just remember:
use async when it makes sense, manage your I/O carefully, and make sure you’ve got error-handling oven mitts at the ready!
2. Advanced Routing: The Map of Your FastAPI World
Routing is the backbone of FastAPI—like a GPS guiding every request to its destination.
In this part, we’ll dive into routers, parameters, and middleware to organize and streamline your FastAPI applications.
Get ready for a journey through the “highways” of FastAPI! 🚗💨
2.1. Introduction to Routers
Let’s start by breaking down routers.
Think of them as different sections of a city: each router is responsible for handling related endpoints, like the “shopping district” or “residential zone” of your app.
In a simple project, you might only need a single main.py to handle all routes. But as your app grows, it becomes necessary to group routes logically—by features or services. FastAPI provides APIRouter to help you do just that.
Here’s a basic example:
from fastapi import FastAPI, APIRouter

app = FastAPI()

# Create a new router for user-related routes
user_router = APIRouter()

@user_router.get("/users/")
async def get_users():
    return {"users": ["Ményssa", "Eric", "Paul"]}

@user_router.get("/users/{user_id}")
async def get_user(user_id: int):
    return {"user": user_id}

# Include the user_router in the main FastAPI app
app.include_router(user_router)
Current Project Structure
Right now, you have a very simple project structure:
├── env/
├── main.py
├── requirements.txt
Let’s refactor it to make use of routers. Create a folder to hold all your route files:
├── env/
├── main.py
├── routers/         # New folder to store routers
│   └── users.py     # New file for user-related routes
├── requirements.txt
Inside users.py:
from fastapi import APIRouter

user_router = APIRouter()

@user_router.get("/users/")
async def get_users():
    return {"users": ["Alice", "Bob", "Charlie"]}

@user_router.get("/users/{user_id}")
async def get_user(user_id: int):
    return {"user": user_id}
Then, include this router in main.py:
from fastapi import FastAPI
from routers.users import user_router

app = FastAPI()

app.include_router(user_router)
Now you’ve separated concerns and logically grouped your endpoints. This makes your app easier to scale and maintain!
Organizing Endpoints into Logical Groups
You can create more routers for different areas of your app, like products.py for managing a product catalog or orders.py for processing orders. This modular approach keeps things clean, especially as the number of endpoints grows.
├── env/
├── main.py
├── routers/
│   ├── users.py
│   ├── products.py
│   └── orders.py
├── requirements.txt
Each router becomes a dedicated zone of your app, handling its own logic. This modularity is a huge win for maintainability and scalability.
2.2. Path Parameters and Query Parameters
Parameters allow users to send extra information with requests, making them more flexible and dynamic. See also Lecture 1
Path Parameters
Path parameters are part of the URL. They let you capture dynamic parts of a route. For example, if you have /users/{user_id}, {user_id} is a path parameter.
@user_router.get("/users/{user_id}")
async def get_user(user_id: int):
    return {"user": user_id}
🔥 Explanation: Here, user_id is extracted from the URL and passed as an argument to the handler function.
Query Parameters
Query parameters are key-value pairs that follow a ? in the URL. They’re usually used to filter or sort data.
For example, if you have /users?name=Paul, name is a query parameter:
@user_router.get("/users/")
async def get_users(name: str = None):
    if name:
        return {"filtered_user": name}
    return {"users": ["Ményssa", "Eric", "Paul"]}
🔥 Explanation: Here, name is a query parameter that filters the list of users. If no name is provided, it returns the full list.
Validating Parameters with Dependency Injection
FastAPI’s dependency injection system allows you to validate parameters before they reach the route handler. For example, you can use Pydantic models to validate query parameters:
from pydantic import BaseModel

class UserQueryParams(BaseModel):
    name: str
    age: int

@user_router.get("/search/")
async def search_users(params: UserQueryParams):
    return {"name": params.name, "age": params.age}
With dependency injection, FastAPI will automatically validate the query parameters based on the UserQueryParams schema.
2.3. Custom Routers and Middleware
Let’s now explore how to extend routers and add middleware to handle more advanced use cases.
Creating Custom Routers for Specific Use Cases
You can create custom routers for specific sections of your app, each with its own set of routes and logic.
For instance, let’s create an admin router with custom logic:
from fastapi import APIRouter

admin_router = APIRouter()

@admin_router.get("/admin/reports")
async def get_admin_reports():
    return {"report": "Admin report data"}
🔥 Explanation: This custom router can be used to separate admin functionality from general user functionality. It helps ensure the right people access the right routes.
Implementing Middleware for Cross-Cutting Concerns
Middleware is code that runs before or after each request. It’s great for logging, authentication, and other cross-cutting concerns.
Here’s an example of middleware that logs the time taken for each request:
from fastapi import FastAPI
import time

app = FastAPI()

@app.middleware("http")
async def log_requests(request, call_next):
    start_time = time.time()
    response = await call_next(request)
    duration = time.time() - start_time
    print(f"Request: {request.url}, Duration: {duration}s")
    return response
🔥 Explanation: With this middleware, every request gets timed and logged. Middleware is powerful because it can intercept every request and response, applying logic that affects the entire app.
Bonus: Custom Error Handling with Middleware You can even use middleware for custom error handling. For example, you might want to catch all exceptions and return a custom error message:
@app.middleware("http")
async def custom_error_handling(request, call_next):
    try:
        return await call_next(request)
    except Exception as e:
        return JSONResponse(status_code=500, content={"error": str(e)})
🔥 Explanation: This middleware catches any unhandled exceptions and returns a consistent error response to the client.
By organizing your FastAPI app into logical pieces and implementing advanced routing techniques, you’ll keep your code clean and scalable—like a well-mapped city!
3. Database Dynamo: Powering Your App
This is the heart of most web applications : The database.
It’s the powerful engine that drives the storage and retrieval of your data, and in this section, we’ll explore how to set up, manage, and interact with databases in FastAPI.
3.1. Choosing the Right Database
Choosing the right database is like choosing the right vehicle for a road trip:
Do you want a rugged SUV (NoSQL) or a precision-engineered sports car (SQL)?
It all depends on the type of data, how it’s structured, and what you need in terms of performance.
SQL vs. NoSQL Databases
- SQL: Think of SQL databases like Excel sheets—they’re great for structured data with clear relationships. You can run complex queries across multiple tables, and they’re backed by solid ACID compliance (Atomicity, Consistency, Isolation, Durability). Common options include PostgreSQL, MySQL, and SQLite.
➡️ Use case: Banking systems, e-commerce platforms where data integrity and relationships matter.
- NoSQL: NoSQL databases, on the other hand, are more like dynamic, flexible containers. They can handle semi-structured or unstructured data like JSON documents. They scale horizontally, which means they work great with massive datasets.
➡️ Use case: Social networks, real-time applications, or scenarios where data structure is constantly changing (e.g., MongoDB, Cassandra).
Popular Databases for FastAPI
When it comes to FastAPI, the database world is your oyster. Here are some great options:
PostgreSQL: The SQL superstar! It’s powerful, open-source, and works smoothly with FastAPI. Great for complex queries, relational data, and transactional applications.
MongoDB: NoSQL king! Ideal for flexible, large-scale applications where the structure isn’t rigid. Use it if you’re dealing with JSON-like data or want to easily scale horizontally.
SQLite: Lightweight and portable SQL option. Best for smaller applications or quick prototypes. It’s built into Python, so no additional setup required.
Analogy Time:
SQL databases are like libraries, neatly organized with sections, rows, and books that reference other books (relational).
NoSQL databases are like a garage sale where things might not be perfectly organized, but you can grab what you need quickly (flexibility).
3.2. SQLAlchemy and SQLModel
FastAPI makes working with databases easy, thanks to SQLAlchemy and SQLModel.
Let’s break them down and see how they power up your database interactions.
3.2.1. Using SQLAlchemy for Database Interactions
SQLAlchemy is one of the most powerful and flexible libraries for working with relational databases in Python. It gives you fine-grained control over every aspect of database interaction.
It’s an ORM* (Object Relational Mapper) that lets you work with databases in a Pythonic way—no more raw SQL queries unless you want to.
ORM stands for Object-Relational Mapper. It’s a programming technique that bridges the gap between object-oriented programming (OOP) and relational databases.
In simpler terms, an ORM allows you to interact with database tables as if they were objects in your programming language. This means you can use familiar OOP concepts like classes, objects, and methods to create, read, update, and delete data in your database.
Here’s how it works:
- Mapping: The ORM defines a mapping between your object classes and database tables. This mapping specifies how properties of your objects correspond to columns in the database table.
- Data Access: You can use your object’s methods to perform database operations. For example, to save an object, you might call a
save()method. The ORM will automatically translate this into the appropriate SQL query to insert data into the database. - Data Retrieval: To retrieve data from the database, you can query for objects based on certain criteria. The ORM will translate your query into SQL and return the results as objects.
Benefits of using ORMs:
Simplified development: ORMs can significantly reduce the amount of boilerplate code needed to interact with databases.
Improved productivity: By using familiar OOP concepts, developers can work more efficiently and make fewer errors.
Portability: ORMs can often be used with different databases, making it easier to switch between systems.
Abstraction: ORMs provide a layer of abstraction between your application and the database, making your code more maintainable and easier to test.
Popular ORMs include:
- SQLAlchemy for Python
- Hibernate for Java
- Entity Framework for .NET
- ActiveRecord for Ruby
By using an ORM, you can focus on building your application’s logic without having to worry about the intricacies of SQL and database interactions.
Let’s break this down step by step to make it super clear. We’ll start with the basics of creating a table and then move into interacting with that table using SQLAlchemy.
1. Define a SQLAlchemy Model (Table Representation)
In a database, a table stores data in rows and columns. In SQLAlchemy, we create a model that acts like a blueprint for a database table.
What’s happening in the code:
from sqlalchemy import create_engine, Column, Integer, String
from sqlalchemy.ext.declarative import declarative_base
from sqlalchemy.orm import sessionmakercreate_engine: Think of this as your connection to the database. In this example, we’re using SQLite, which is a lightweight, file-based SQL database (though this could be PostgreSQL, MySQL, etc.). The engine is the bridge between SQLAlchemy and the actual database.declarative_base: This is the starting point for any model in SQLAlchemy. We use it to define tables. TheBaseclass lets SQLAlchemy know which classes (tables) should be mapped to the database.sessionmaker: This is a factory for creating sessions, which are used to talk to the database (we’ll get to sessions later).
# Connect to a SQLite database (or PostgreSQL)
engine = create_engine("sqlite:///mydb.db")
Base = declarative_base()
engine = create_engine("sqlite:///mydb.db"): This line creates the connection to the SQLite database, which is stored in a file calledmydb.db. If you were using PostgreSQL, the string would look something like this:engine = create_engine("postgresql://username:password@localhost/dbname")Base = declarative_base(): This creates the base classBase, which we’ll use to define all our tables (models) in the future.
2. Defining the User Table
Now, let’s create the User table:
# Define a model representing a table
class User(Base):
    __tablename__ = "users"
    id = Column(Integer, primary_key=True, index=True)
    name = Column(String, index=True)
🔥 Explanation:
class User(Base)defines a classUserthat inherits fromBase. Each class in SQLAlchemy is mapped to a table in the database, so this class is our blueprint for theuserstable.__tablename__ = "users"sets the table name to"users". Whenever we query or modify data, this table name is used in the background.
Inside this class, we define columns, which are the fields in our table: - id = Column(Integer, primary_key=True, index=True) creates an id column in the table, which is an integer, the primary key (unique for each row), and indexed for fast lookups. - name = Column(String, index=True) creates a name column that stores strings (text) and is also indexed.
3. Create the Table in the Database
Now that we’ve defined our User model, we need to actually create the table in the database:
# Create the table in the database
Base.metadata.create_all(bind=engine)
🔥 Explanation: Base.metadata.create_all(bind=engine) tells SQLAlchemy to take all the models we’ve defined (in this case, the User model) and create the corresponding tables in the database connected to engine. This will create the users table in mydb.db.
4.Interacting with the Database (CRUD Operations)
Once our table is created, we can start performing CRUD operations (Create, Read, Update, Delete) to interact with our data.
To communicate with the database, we need a session. A session is like a temporary workspace where we can make changes to the database, and once we’re done, we can commit (save) those changes.
# Create a session to interact with the database
SessionLocal = sessionmaker(autocommit=False, autoflush=False, bind=engine)
🔥 Explanation: Here, we define SessionLocal, a session factory that will let us create sessions when we need them.
5. Adding Data to the Database
Let’s use this session to add a new user to the users table:
# Create a session and add a new user
db = SessionLocal()
new_user = User(name="Ményssa")
db.add(new_user)
db.commit()
db.close()
🔥 Explanation:
db = SessionLocal()create a new session usingSessionLocal(). This session allows us to interact with the database.new_user = User(name="Ményssa")create a new instance of theUsermodel. In this case, we’re adding a user with the name Ményssa. Theidcolumn will be automatically generated because it’s a primary key.db.add(new_user)add this new user to our session (this step only adds it to the session, not the database yet).db.commit()saves (commits) the changes to the database. The new user is now stored in theuserstable.db.close()close the session to free up resources.
Summary of CRUD Operations
- Define a SQLAlchemy Model (This represents a table in your database):
from sqlalchemy import create_engine, Column, Integer, String
from sqlalchemy.ext.declarative import declarative_base
from sqlalchemy.orm import sessionmaker

# Connect to a SQLite database (or PostgreSQL)
engine = create_engine("sqlite:///mydb.db")
Base = declarative_base()

# Define a model representing a table
class User(Base):
    __tablename__ = "users"
    id = Column(Integer, primary_key=True, index=True)
    name = Column(String, index=True)

# Create the table in the database
Base.metadata.create_all(bind=engine)

# Create a session to interact with the database
SessionLocal = sessionmaker(autocommit=False, autoflush=False, bind=engine)- Interacting with the Database: Now that we’ve created a table, let’s add some users:
# Create a session and add a new user
db = SessionLocal()
new_user = User(name="Pierre")
db.add(new_user)
db.commit()
db.close()
SQLAlchemy simplifies database interactions by letting you work with Python objects rather than raw SQL queries, making it easier to manage your app’s data.
3.2.2. SQLModel: The Best of Both Worlds (SQLAlchemy + Pydantic)
While SQLAlchemy is powerful, SQLModel takes things a step further by combining the simplicity of Pydantic (for data validation) and the power of SQLAlchemy.
SQLModel is built on top of SQLAlchemy but introduces Pydantic-style validation. It takes the best parts of both worlds: - The powerful ORM capabilities of SQLAlchemy - The data validation magic of Pydantic
So, what does this mean? You get to use SQLAlchemy’s robust features while reducing the boilerplate code, and you get automatic data validation.
1. Key Differences with SQLAlchemy:
- Data Validation Built-In: SQLModel integrates Pydantic’s data validation. This means that every time you define a model, it automatically validates the data for you.
- Less Boilerplate: SQLModel cuts down on repetitive code. You don’t need to define columns manually like in SQLAlchemy; you can use Python’s type hints, making your code cleaner and easier to maintain.
- Declarative Syntax: You define your models in a more Pythonic way, without needing to write repetitive column definitions.
- Pydantic + SQLAlchemy Integration: SQLModel works seamlessly with FastAPI, because FastAPI is already built on Pydantic for data validation.
2. SQLModel Example Breakdown
from sqlmodel import SQLModel, Field, create_engine

class User(SQLModel, table=True):
    id: int = Field(default=None, primary_key=True)
    name: str
🔥 Explanation:
SQLModelis the base class for all your models. It inherits from both Pydantic and SQLAlchemy, so it does the heavy lifting for you.table=Truetells SQLModel to treat this class as a database table. Without it, the class would just be a data model for validation purposes.Fields:
id: int = Field(default=None, primary_key=True): Instead of defining the column type manually (like in SQLAlchemy), we use type hints (intforidandstrforname) and theFieldfunction from Pydantic for additional options likeprimary_key=True.name: str: This defines a simplenamecolumn with astringtype.
Already, this feels cleaner and more Pythonic.
Here’s a full script using SQLModel to create a SQLite database, define a User model, and perform basic CRUD operations.
This will give you a complete picture of how SQLModel works in practice:
from fastapi import FastAPI, Depends, HTTPException
from sqlmodel import SQLModel, Field, create_engine, Session, select
import uvicorn  # Import uvicorn to run the application

app = FastAPI()

# 1. Define the User model using SQLModel
class User(SQLModel, table=True):
    id: int = Field(default=None, primary_key=True)
    name: str

# 2. Create the SQLite database engine
DATABASE_URL = "sqlite:///./mydb.db"
engine = create_engine(DATABASE_URL, echo=True)

# 3. Create the database tables
SQLModel.metadata.create_all(engine)

# 4. Create a session to interact with the database
def get_session():
    with Session(engine) as session:
        yield session

# Add a root route to prevent the 404 error
@app.get("/")
def read_root():
    return {"message": "Welcome to the User Management API!"}

# 5. Add a new user to the database
@app.post("/users/", response_model=User)
def create_user(name: str, session: Session = Depends(get_session)):
    new_user = User(name=name)
    session.add(new_user)
    session.commit()
    session.refresh(new_user)
    return new_user

# 6. Fetch all users from the database
@app.get("/users/", response_model=list[User])
def get_users(session: Session = Depends(get_session)):
    statement = select(User)
    results = session.exec(statement)
    users = results.all()
    return users

# 7. Update a user in the database
@app.put("/users/{user_id}", response_model=User)
def update_user(user_id: int, new_name: str, session: Session = Depends(get_session)):
    user = session.get(User, user_id)
    if not user:
        raise HTTPException(status_code=404, detail="User not found")
    user.name = new_name
    session.add(user)
    session.commit()
    session.refresh(user)
    return user

# 8. Delete a user from the database
@app.delete("/users/{user_id}")
def delete_user(user_id: int, session: Session = Depends(get_session)):
    user = session.get(User, user_id)
    if not user:
        raise HTTPException(status_code=404, detail="User not found")
    session.delete(user)
    session.commit()
    return {"detail": "User deleted"}
🔥 Big, big Explanation
Let’s break down the key parts of your FastAPI script to provide a clear understanding of its structure and functionality:
- Imports
from fastapi import FastAPI, Depends, HTTPException
from sqlmodel import SQLModel, Field, create_engine, Session, select
import uvicorn # Import uvicorn to run the application- FastAPI: The main framework used to create the API.
- Depends: A helper to declare dependencies for your path operations (like database sessions).
- HTTPException: Used to raise HTTP errors with a specified status code and message.
- SQLModel: A library that combines Pydantic and SQLAlchemy for data modeling and database operations.
- Field: A function to define the fields of a SQLModel class.
- create_engine: Used to create a database engine.
- Session: Represents a workspace for interacting with the database.
- select: A function used to create SQL SELECT statements.
- uvicorn: An ASGI server used to run your FastAPI application.
- Creating the FastAPI App
app = FastAPI()- FastAPI Instance: This line initializes the FastAPI application. This instance will handle all the incoming requests.
- Defining the User Model
class User(SQLModel, table=True):
    id: int = Field(default=None, primary_key=True)
name: str- User Class: This class defines the
Usermodel as a database table. table=True: Indicates that this class should be treated as a database table.- Fields:
id: An integer that serves as the primary key (automatically incremented).name: A string representing the user’s name.
- Creating the Database Engine
DATABASE_URL = "sqlite:///./mydb.db"
engine = create_engine(DATABASE_URL, echo=True)- DATABASE_URL: Specifies the connection string for the SQLite database (using a file named
mydb.db). create_engine: Creates the database engine that allows the application to interact with the database. Theecho=Trueflag enables logging of all the generated SQL statements.
- Creating Database Tables
SQLModel.metadata.create_all(engine)- This line creates all tables defined in the SQLModel classes in the database. If the table already exists, it will not be recreated.
- Creating a Database Session
def get_session():
    with Session(engine) as session:
yield sessionget_sessionfunction: A generator function that creates a database session for each request. It ensures that the session is properly managed (opened and closed).
- Root Route
@app.get("/")
def read_root():
return {"message": "Welcome to the User Management API!"}- Root Endpoint: A simple GET endpoint that returns a welcome message. This prevents the 404 error when accessing the root URL.
- Adding a New User
@app.post("/users/", response_model=User)
def create_user(name: str, session: Session = Depends(get_session)):
    new_user = User(name=name)
    session.add(new_user)
    session.commit()
    session.refresh(new_user)
return new_user- POST Endpoint: Adds a new user to the database.
name: str: The name of the user is received as a path parameter.session: Session = Depends(get_session): Injects a session dependency into the function.- Creating and Committing: The new user is created, added to the session, committed to the database, and returned as a response.
- Fetching All Users
@app.get("/users/", response_model=list[User])
def get_users(session: Session = Depends(get_session)):
    statement = select(User)
    results = session.exec(statement)
    users = results.all()
return users- GET Endpoint: Fetches all users from the database.
- SQL Select Statement: Uses the
selectfunction to create a query and executes it. - Returns: A list of all user records.
- Updating a User
@app.put("/users/{user_id}", response_model=User)
def update_user(user_id: int, new_name: str, session: Session = Depends(get_session)):
    user = session.get(User, user_id)
    if not user:
        raise HTTPException(status_code=404, detail="User not found")
    user.name = new_name
    session.add(user)
    session.commit()
    session.refresh(user)
return user- PUT Endpoint: Updates the name of an existing user identified by
user_id. - Error Handling: If the user is not found, raises a 404 HTTP exception.
- Session Management: Updates the user object, commits changes, and returns the updated user.
- Deleting a User
@app.delete("/users/{user_id}")
def delete_user(user_id: int, session: Session = Depends(get_session)):
    user = session.get(User, user_id)
    if not user:
        raise HTTPException(status_code=404, detail="User not found")
    session.delete(user)
    session.commit()
return {"detail": "User deleted"}- DELETE Endpoint: Deletes the user identified by
user_id. - Error Handling: If the user is not found, raises a 404 HTTP exception.
- Session Management: Deletes the user and commits the changes.
The use of FastAPI’s dependency injection for database sessions and structured error handling ensures a robust application. Each endpoint is clearly defined and returns data in a structured format, making it easy to use and extend.
5. Why Use SQLModel in FastAPI Projects?
SQLModel was designed with FastAPI in mind. Here’s why it’s a great fit for FastAPI projects:
- Seamless Integration with FastAPI: Both FastAPI and SQLModel use Pydantic under the hood, so the models you define in SQLModel work perfectly with FastAPI’s request/response validation system.
- Automatic Data Validation: SQLModel automatically validates incoming and outgoing data, which fits beautifully with FastAPI’s validation-first philosophy.
- Reduced Boilerplate: You write less code compared to raw SQLAlchemy. For example, you don’t need to specify columns explicitly, and everything integrates smoothly with FastAPI.
3.2.3 Summary: SQLAlchemy vs. SQLModel
| Feature | SQLAlchemy | SQLModel |
|---|---|---|
| Data Validation | Separate (manually or with Pydantic) | Built-in with Pydantic |
| Syntax | More verbose (manually define columns) | Simpler, using Python type hints |
| FastAPI Integration | Works, but not designed for it | Seamlessly integrated |
| Boilerplate Code | More boilerplate (defining columns) | Less boilerplate (uses type hints + Pydantic) |
| Primary Use Case | Large, complex applications | FastAPI apps, quick development |
In essence, SQLAlchemy gives you more control for complex applications, but if you’re working with FastAPI, SQLModel makes everything cleaner, simpler, and faster—without sacrificing power. It’s like having a Swiss Army knife that’s perfectly sharpened for FastAPI’s needs.
3.3 Database Migrations (Optional)
Database migrations are crucial for managing changes to your database schema as your application evolves.
3.1. Managing Database Schema Changes
Alembic is a lightweight database migration tool for use with SQLAlchemy. It helps you version control your database schema changes and makes it easier to apply these changes across different environments.
Key Features of Alembic:
Version Control: Each migration script is like a bookmark in your tree’s growth. It tells you exactly how the branches have changed over time. You can easily look back to see when a new feature was added or an old one was removed.
Autogeneration: With Alembic, you don’t have to manually write every migration script. It’s like having a smart assistant who automatically detects changes in your models and drafts the migration scripts for you. Imagine saying, “Hey Alembic, I added a new leaf!” and it responds with a complete plan to incorporate that leaf into your tree.
Consistent Environments: Alembic ensures that whether you’re working in your cozy development environment or the bustling production stage, everyone is looking at the same beautiful tree. It keeps all developers and environments in sync, avoiding those dreaded “It works on my machine!” moments.
The Power of Alembic in Your Hands
While Alembic might feel optional for small projects, it’s like having a safety net when you decide to jump into more complex applications.
Imagine you’ve planted a tiny sapling today, but a year later, it’s a full-fledged tree with multiple branches—some may need to be reshaped or removed.
By implementing Alembic from the start, you save yourself from headaches down the line as your application grows.
So, whether you’re just starting out or scaling to new heights, think of Alembic as your trusty tool to manage database changes, keeping everything neat, organized, and growing beautifully!
3.2. Step-by-Step Guide
1. Installing Alembic
First, install Alembic via pip:
pip install alembic2. Setting Up Alembic
Initialize Alembic in your FastAPI project. Run this command in your terminal:
alembic init alembicThis creates a new directory called alembic, which contains configuration files and a folder for your migration scripts.
3. Configuring Alembic
In the alembic.ini file, set the database URL to match your FastAPI project:
[alembic]
# A generic, single database configuration.
sqlalchemy.url = sqlite:///./mydb.db
You should also modify the env.py file in the alembic folder to work with SQLModel. Replace the line:
from myapp import mymodelwith:
from myapp.models import User # Import your SQLModel classes hereMake sure to import the base metadata:
from sqlmodel import SQLModel

target_metadata = SQLModel.metadata
4. Creating a Migration
When you modify your models (for example, adding a new column), create a migration script:
alembic revision --autogenerate -m "Add email column to users"This command creates a new migration file in the alembic/versions directory with the changes detected by Alembic.
Example: Adding an Email Column to User Model
Let’s say you want to add an email column to your User model. Update your User model like this:
from sqlmodel import SQLModel, Field

class User(SQLModel, table=True):
    id: int = Field(default=None, primary_key=True)
    name: str
    email: str = Field(default=None)  # New email field
After saving this change, run the Alembic command to generate a migration:
alembic revision --autogenerate -m "Add email column to users"Alembic generates a migration script similar to the following:
"""Add email column to users

Revision ID: 123456789abc
Revises: previous_revision_id
Create Date: 2024-10-11 12:00:00.000000

"""
from alembic import op
import sqlalchemy as sa
from sqlmodel import SQLModel

# revision identifiers, used by Alembic.
revision = '123456789abc'
down_revision = 'previous_revision_id'
branch_labels = None
depends_on = None

def upgrade():
    # Adding the email column
    op.add_column('user', sa.Column('email', sa.String(), nullable=True))

def downgrade():
    # Dropping the email column
    op.drop_column('user', 'email')
5. Applying the Migration
Once you’ve created the migration script, apply it to your database:
alembic upgrade headThis command runs the upgrade function in your migration script, applying the changes to your database.
By following these steps, you can effectively manage your database schema changes as your application grows and evolves. Now that we have a robust migration strategy in place, it’s time to delve into more advanced topics that enhance our application’s architecture and functionality.
4. Advanced Topics Toolbox (Very advanced, so very optional)
You’ve made it this far—well done! 🎉
Now we’re diving into the supercharged section, where we tackle some seriously advanced topics in FastAPI.
These are the power tools that can turn you from a solid developer into a FastAPI wizard.
They’re optional, but if you’re up for the challenge, you’ll come out with a toolbox of knowledge that will let you build, secure, and optimize APIs like a pro.
Let’s open the toolbox:
4.1. Dependency Injection
“Why do we need it?”
Think of dependency injection like getting a superpower to “inject” exactly what your code needs, when it needs it, without unnecessary clutter! It’s all about clean, maintainable code that scales with your project.
Understanding Dependency Injection in FastAPI
You’ll see how FastAPI makes managing dependencies a breeze. Instead of cluttering up your logic with repetitive calls, you inject them cleanly.Using
fastapi.Dependsfor Dependency Injection
You’ll learn how to simplify your code by using theDependsmethod—like ordering takeout for your app’s resources instead of cooking every time.Creating Custom Dependencies
Why stop at the basics? Learn to create your own custom dependencies, from database connections to third-party API calls.
4.1.1 What is Dependency Injection (DI)?
In FastAPI, DI helps you inject dependencies into your routes and functions without having to create them manually each time.
The magic happens using Depends.
4.1.2 FastAPI’s Depends in Action
FastAPI uses Depends to handle dependency injection in a clean and Pythonic way. Let’s look at how it works:
from fastapi import FastAPI, Depends

app = FastAPI()

# Define a dependency
def get_db_connection():
    return {"db": "connected"}

# Use the dependency in an endpoint
@app.get("/items/")
def read_items(db_conn = Depends(get_db_connection)):
    return {"message": f"Database status: {db_conn['db']}"}
🔥 Explanation:
get_db_connection(): This function simulates connecting to a database.Depends(get_db_connection): TheDepends()function calls our dependency and “injects” its return value into the route.- Now, the
db_connvariable has access to the database connection without having to create it inside the route.
4.1.3 Custom Dependencies
FastAPI isn’t just limited to database connections! You can create your own custom dependencies to manage authentication, logging, configuration, and more.
Let’s build a simple authorization dependency:
from fastapi import HTTPException, Header

def verify_token(x_token: str = Header(...)):
    if x_token != "supersecrettoken":
        raise HTTPException(status_code=403, detail="Invalid token")
    return True

@app.get("/secure-data/")
def secure_data(token = Depends(verify_token)):
    return {"message": "You have access to secure data!"}
🔥 Explanation:
verify_token(): This function checks if the token provided in thex_tokenheader is correct.Depends(verify_token): If the token is valid, the user can access the secure route. If not, it raises an error.
4.2. Testing FastAPI Applications
“Your code works… but does it really?”
Testing is like proofreading for developers. Sure, your app runs on your machine, but what about production? What about edge cases? 🤔
Unit Testing, Integration Testing, and API Testing
Get familiar with different types of tests and when to use them. Unit tests are like checking individual LEGO bricks, while integration tests check the full LEGO model.Using Tools like pytest for Testing
Learn the magic ofpytest—your testing buddy! From simple tests to mocking dependencies, we’ll cover it all.
4.2.1 Why is Testing Important?
Imagine launching a rocket without checking if all the parts work—scary, right? In development, it’s the same! Testing ensures that your code behaves as expected, so you don’t end up with unexpected bugs in production.
Types of Testing :
- Unit Testing: Test individual components of your code (e.g., a function or a class) to make sure they behave correctly in isolation.
- Integration Testing: Test how different parts of your application work together (e.g., database, API, external services).
- API Testing: Specifically focus on testing the endpoints of your FastAPI app to ensure they return the right responses and handle errors gracefully.
4.2.2 Setting Up Pytest
FastAPI plays well with pytest, one of the most popular testing frameworks in Python. It’s simple, powerful, and easy to integrate.
- Install pytest:
pip install pytest- Install TestClient from FastAPI: FastAPI has a built-in TestClient (powered by Starlette) that you can use to send HTTP requests during testing.
pip install httpx4.2.3 Writing Your First Unit Test
Let’s start small by writing a unit test for a simple FastAPI route.
Here’s your API:
from fastapi import FastAPI

app = FastAPI()

@app.get("/hello/")
def read_hello():
    return {"message": "Hello, World!"}
Writing the Test:
from fastapi.testclient import TestClient
from myapp import app  # Assuming your app is defined in 'myapp.py'

client = TestClient(app)

def test_read_hello():
    response = client.get("/hello/")
    assert response.status_code == 200
    assert response.json() == {"message": "Hello, World!"}
🔥 Explanation:
- TestClient: This allows us to simulate HTTP requests to the FastAPI app during tests.
client.get("/hello/"): We send a GET request to the/hello/route.- Assertions: We check if the response’s status code is 200 (OK) and if the response data matches
{"message": "Hello, World!"}.
4.2.4 Writing Integration Tests
Now, let’s take things up a notch. We’ll write an integration test for an endpoint that interacts with a database.
API to Test:
from fastapi import FastAPI, Depends
from sqlmodel import SQLModel, Session, create_engine, Field, select

app = FastAPI()

class User(SQLModel, table=True):
    id: int = Field(primary_key=True)
    name: str

engine = create_engine("sqlite:///./test.db")

def get_session():
    with Session(engine) as session:
        yield session

@app.post("/users/")
def create_user(name: str, session: Session = Depends(get_session)):
    user = User(name=name)
    session.add(user)
    session.commit()
    return user
Writing the Integration Test:
import pytest
from fastapi.testclient import TestClient
from sqlmodel import SQLModel, Session
from myapp import app, engine

client = TestClient(app)

@pytest.fixture
def setup_db():
    # Set up the database before each test
    SQLModel.metadata.create_all(engine)
    yield
    # Tear down the database after each test
    SQLModel.metadata.drop_all(engine)

def test_create_user(setup_db):
    response = client.post("/users/", json={"name": "Alice"})
    assert response.status_code == 200
    data = response.json()
    assert data["name"] == "Alice"
    assert "id" in data  # Check that the user has an id
🔥 Explanation:
setup_db(): A pytest fixture that sets up and tears down the database for each test. This ensures that your tests always start with a clean slate.- Integration Test: We simulate a POST request to create a new user and verify that the response data contains the expected user name and a generated ID.
4.2.5 Mocking Dependencies in Tests
Sometimes, you don’t want to test every part of your app during unit tests. Maybe you don’t want to hit the actual database but want to mock the database connection instead. Here’s how you can do it:
from unittest.mock import MagicMock
from fastapi import Depends

def fake_get_session():
    db = MagicMock()  # Mocked database session
    yield db

@app.post("/fake-user/")
def create_fake_user(name: str, session = Depends(fake_get_session)):
    session.add(name)  # Add a name to the mocked session
    return {"message": f"User {name} added"}
🔥 Explanation:
MagicMock(): A utility from theunittestlibrary that allows us to mock dependencies like database connections.- Fake Dependency: We use the fake session during testing to ensure we don’t interact with the real database.
4.2.6 Testing Summary
- Unit tests: Test individual components in isolation.
- Integration tests: Ensure that different parts of your app work well together.
- TestClient: Allows you to simulate HTTP requests to your FastAPI app.
- Pytest: A powerful testing framework that integrates seamlessly with FastAPI.
- Mocking: Helps you isolate your tests from real dependencies.
4.3. Security in FastAPI
“Locks on the door, security cameras on the house.”
Security is non-negotiable. No one wants their API hacked or misused! You’ll learn how to protect your FastAPI app from common vulnerabilities.
“Who are you? And what are you allowed to do?”
FastAPI makes handling authentication and authorization simple, but don’t be fooled—it’s a crucial topic.
Authentication and Authorization
Keep the wrong people out and make sure the right people can only do what they’re supposed to do.Protecting Against Common Vulnerabilities
We’ll go over real-world threats like SQL injection, XSS, and CSRF, and how to defend against them. Think of it as locking all the windows before leaving your house.Input Validation and Sanitization
Clean your data like you’d wash your hands—always! No messy, untrusted input allowed.Secure Coding Practices
It’s like learning to cook without burning your kitchen down. Follow best practices to keep your app safe.
4.3.1 The Importance of Security in APIs
Your API is like the front door to your application, and just like your house, you want to make sure it’s locked and secure. Poor security practices can expose sensitive data, compromise user privacy, and leave your app vulnerable to attacks. With FastAPI, implementing security features is not only crucial but also relatively straightforward.
4.3.3 Protecting Against Common Vulnerabilities
In addition to authentication and authorization, it’s important to protect your FastAPI app against common security threats:
- SQL Injection: Use parameterized queries or an ORM like SQLModel to avoid exposing your app to malicious SQL injection attacks.
@app.get("/users/")
def get_users(name: str, session: Session = Depends(get_session)):
    statement = select(User).where(User.name == name)
    return session.exec(statement).all()
Cross-Site Scripting (XSS): Always sanitize user inputs that are rendered back in the UI, especially if you’re interacting with frontend components.
Cross-Site Request Forgery (CSRF): FastAPI doesn’t include CSRF protection by default, but you can integrate external packages or implement custom middleware to guard against CSRF attacks.
Input Validation: FastAPI’s Pydantic models help you validate and sanitize inputs automatically. You should always ensure that the data users submit conforms to the expected format.
class UserCreate(BaseModel):
    username: str
    email: EmailStr  # This ensures a valid email format
4.3.4 Secure Coding Practices
Follow these best practices to keep your code secure:
- Limit Exposure: Only expose the routes that are necessary and avoid allowing external access to sensitive routes (e.g., admin areas).
- Use HTTPS: Always deploy your FastAPI application with HTTPS in production to encrypt all data between the client and server.
- Update Dependencies: Regularly update your dependencies to ensure you’re using the latest security patches.
- Environment Variables: Store sensitive information (like database credentials and secret keys) in environment variables, not in your codebase.
- Logging: Set up proper logging to monitor and detect suspicious activity.
4.4. Performance Optimization
“Faster is always better, right?”
Speed is key when building APIs. Let’s make sure your FastAPI app can handle the pressure—whether it’s 10 users or 10,000.
Now that you’ve built a secure and functional FastAPI app, it’s time to make it fly by focusing on performance optimization! Whether your app is running a high-traffic API, managing real-time data, or simply needs to be more responsive, performance optimization can make a big difference in user experience.
4.4.1 Why Optimize?
Imagine you’re using a writing app that checks your spelling and grammar in real time.
As you type, you expect instant feedback—corrections popping up seamlessly as you go. But what if there’s a lag?
You write a sentence, and the corrections take five seconds to appear. It throws off your rhythm, you lose focus, and eventually, you might give up on the app altogether.
That’s how your users feel when your FastAPI app is slow.
They expect things to work instantly, especially for real-time features. If your app can’t keep up with the demand, they’ll find another tool that can. This lesson will teach you how to optimize your FastAPI app so it stays responsive, even when it’s processing a lot of requests at once.
4.4.2. Caching Strategies: Save Time, Repeat Less
When your app processes the same requests repeatedly, caching can be a lifesaver. Instead of recalculating or re-fetching data for every request, caching lets you store previously computed responses and serve them up super fast.
Example: Caching with fastapi-cache
- Installing the Required Package:
pip install fastapi-cache2- Implementing Basic Caching: Here’s a simple way to cache the response of an endpoint using
fastapi-cache2:
from fastapi import FastAPI
from fastapi_cache import FastAPICache
from fastapi_cache.backends.redis import RedisBackend
import redis

app = FastAPI()

@app.on_event("startup")
async def startup():
    redis_client = redis.Redis(host="localhost", port=6379)
    FastAPICache.init(RedisBackend(redis_client), prefix="fastapi-cache")

@app.get("/items/{item_id}")
@FastAPICache(expire=60)  # Cache this response for 60 seconds
async def get_item(item_id: int):
# Imagine this is an expensive operation like a database call
    return {"item_id": item_id, "description": "This is an item."}
🔥 Explanation: - Redis: We use Redis as a caching backend. Redis is a super fast in-memory data structure store, perfect for caching. - FastAPICache: This decorator caches the response of the /items/{item_id} endpoint for 60 seconds.
Why Caching Matters:
- Faster Responses: By storing responses, you reduce the time it takes to fetch data.
- Reduced Server Load: You’re not hitting your database or performing expensive operations on every request.
4.4.3. Asynchronous Optimization: Handling Many Requests Like a Champ
FastAPI shines when it comes to asynchronous programming. Unlike traditional synchronous frameworks, FastAPI can handle multiple requests concurrently, which means it’s great for high-performance use cases. See in section 1. The magic of Asynchronicity
4.4.4. Profiling and Benchmarking: Measure Before You Improve
You can’t improve what you don’t measure! Profiling and benchmarking tools help you identify performance bottlenecks in your application so you know exactly where optimizations are needed.
Tools for Profiling: - cProfile: Python’s built-in profiler. - py-spy: A sampling profiler that can show you where your app is spending most of its time, even in production.
Example: Using py-spy
Installing
py-spy:bash pip install py-spyProfiling your FastAPI app:
bash py-spy top -- python3 -m uvicorn main:app
This will show you a live breakdown of where your app is spending its CPU time. You can use this information to pinpoint slow parts of your code, like that unoptimized database query or the slow for-loop.
Example: Measuring Latency with timeit
Here’s a quick way to measure the latency of an endpoint using the timeit module:
import timeit

def measure():
    return requests.get("http://localhost:8000/some-endpoint")

print(timeit.timeit(measure, number=10))  # Run the request 10 times
Remember, this section is optional but packed with advanced, exciting tools to supercharge your FastAPI skills!
In Summary
Asynchronicity: The Key to Responsiveness
Understanding asynchronous programming allows your FastAPI applications to handle multiple requests simultaneously, making them faster and more efficient. By leveraging async and await, your app can juggle tasks like a seasoned performer!
Database Integration: Persistence Made Easy
We explored how to connect your FastAPI app with a database using SQLModel. By mastering CRUD operations, you can create, read, update, and delete data effortlessly, paving the way for dynamic applications.
Advanced Topics Toolbox: Powering Up Your Skills
We touched on various advanced topics, including dependency injection, testing, security measures, and performance optimization. These tools are essential for creating robust, secure, and high-performing applications that can handle the demands of modern users.
Now that we’ve covered the advanced topics, let’s dive into Lab 2 and make your FastAPI apps secure, fast, and scalable! 💪